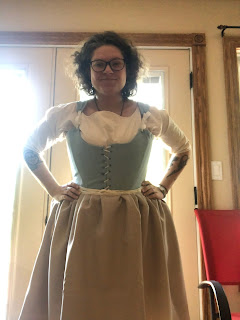
While my beginnings into historical costuming come from the stance of the Society for Creative Anachromism, I have found myself increasingly drawn into the styles and fashions of the mid to late 18th century, from 1740-1790. This is probably due to a brief dalliance with the show Outlander that has been since discarded, but the love of historical costuming prevails. I first played around with the shape of 18th century petticoats worn with other modern clothing, and made several petticoats of various lengths and with various fabrics. Then I journeyed into staymaking, making a pair of late 18th century stays with a short waist. Since, I have made a bum pad, shift, and pocket. Next comes the 1790's Italian gown from the American Duchess book. In this post, I'll outline my adventures with underpinnings.
First, I made the bumpad. It's not a split bumpad like is shown in the American Duchess book "18th Century Dressmaking," but instead is the American Duchess pattern by Simplicity 8162.
This was a fairly straightforward sewing project. I cut the pattern out of its sheet, pinned it to the fabric, cut out the pieces, pinned them, sewed a few quick seams, stuffed the pads with stuffing, sewed it shut and attached some home made bias tape. Took maybe three hours start to finish, and only because I had to stop in the middle and got discombobulated.
After this, I made a petticoat to go over the bumpad, and had to do some math and aligning on my dressform to make the hem correct without making either side, front or back, longer than the other. I didn't quite manage it, as the appendage on my dressform, which usually is supposed to stay sturdy and not fall down at the slightest provocation, fell down and I misaligned it again. So I must refinish the hem and raise the back a bit, as the back is still slightly longer than the front, despite my best efforts to the contrary, and despite the bumpad adding length. It is also several inches shorter than I had anticipated, and will therefore need to be the under petticoat to add fullness to the skirts, and not the final petticoat to be worn with the gown. I had wanted this to be a nice off-white corded petticoat, but perhaps we'll just add a third for Extra Fullness. I'll still make the corded petticoat, and who knows, once I hem this one again, it might just be everyday wear.
Next was the shift. This was made from the American Duchess Simplicity pattern 8579. I machine sewed the foundation seams, and hand felled half of the raw edges. Unfortunately, I had the poor wisdom to work out my forearms and then hand sew for five or six hours (I'm a slow feller) to finish the right hand side, and put my arm out of commission for almost a week. Then I gathered my wits and set out to machine finish the rest. Very slowly, and very carefully, as my previous experience has taught me it is so easy to go too quickly and get everything all wonky. By borrowed grace, none of the seams were wonky, and it was all neatly finished.
One of the fun things about the shift was the gussets! I'd never used gussets before in anything, and found it a really delightful way to add freedom of movement without adding bulk. I have no clue why gussets aren't a thing anymore, because they would drastically increase the fit of the sleeves of many modern styles. It just goes to increase my desire to sew my own clothes, rather than abide by fast fashion. Who knows what will come after this project, though!

Finally, I did a quick two day pocket project, that was entirely
hand sewn. It is a bit on the small side, and I may have to remove the
tapes and reposition it so I can have two pockets on one tape, but it
looks quite delightful and offers a nice place to put my things, should I
need to carry them out. For all previous tapes, I had to use home made
bias tape, but for the pocket I ordered in some nice twill tape. It's
rather thin, so I expect I'll need to order some more, thicker sizes,
but for this purpose it did quite nicely.
That's
it to catch you up on the underpinnings. Most of the projects were very
straightforward, just cut out the pieces and stick them together. The
only one that was involved in any way was the shift, and that was still
done rather quickly. I still have some stockings to knit or sew, and a
cap to make, but I figure those can be nice quick projects in between
the gown and the matching petticoat. Next is to make a mockup (which may
or may not eventually by lined and finished, as is my usual) of the
1890s Italian Gown from "18th Century Dressmaking" and find an
appropriate printed fabric to be the final version. It'll probably start
life as a duvet cover or two, because we are frugal in my house.


Comments
Post a Comment